Picking out an airtight inflatable tent isn't just about comparing prices or staring at pretty photos online. You've got to ask yourself some real questions about the materials, how well it holds air, whether it'll stay stable, and what it's like to actually use day-to-day. Like, will it stay firm on a cold, breezy night? Can you set it up by yourself without wrestling with the pump? Honestly, those little details matter way more than some dramatic product shot. Alright, so here's the thing—we've put together this guide based on real-world experience, what the manufacturers actually claim, and the stuff people keep asking about. We're talking seven key buying tips: seam construction, fabric strength, valve design, ventilation, floor protection, repair options, and how reliable the supplier is. And honestly, the little things? They matter way more than you'd think.
You know, a decent tent really should feel solid once it's inflated – the beams should hold their shape evenly, and you shouldn't spot any weird gaps along the seams. When you're shopping around, definitely dig into the specs: stuff like fabric denier, waterproof ratings, packed weight, warranty terms, and whether you can actually get replacement parts down the line. Sure, independent reviews are helpful, but honestly, they're not always thorough or unbiased – you've gotta take them with a grain of salt. And here's something people often forget: even seasoned campers can miss things like setup space or how loud the pump is when they're picking a model. We're also going to look at how the tent holds up when you inflate it again and again, deal with damp mornings, or pitch it on uneven ground. Honestly, no tent is perfect, and we're not going to pretend otherwise. What we've done instead is put together a practical way to compare your options—spotting the avoidable flaws before you buy, and picking an Airtight Inflatable Tent that actually works for real camping, not just for the marketing guys.
Define Your Airtight Inflatable Tent Needs
Start with the conditions you expect at the campsite. Will you sleep in damp forests, exposed fields, or windy coastal areas? An airtight inflatable tent can improve weather protection, but it may feel warm and humid without planned ventilation. List the number of sleepers, sleeping bags, storage boxes, and cooking equipment. Then add space for movement. A tent that fits four people on paper may feel cramped with wet clothing inside.
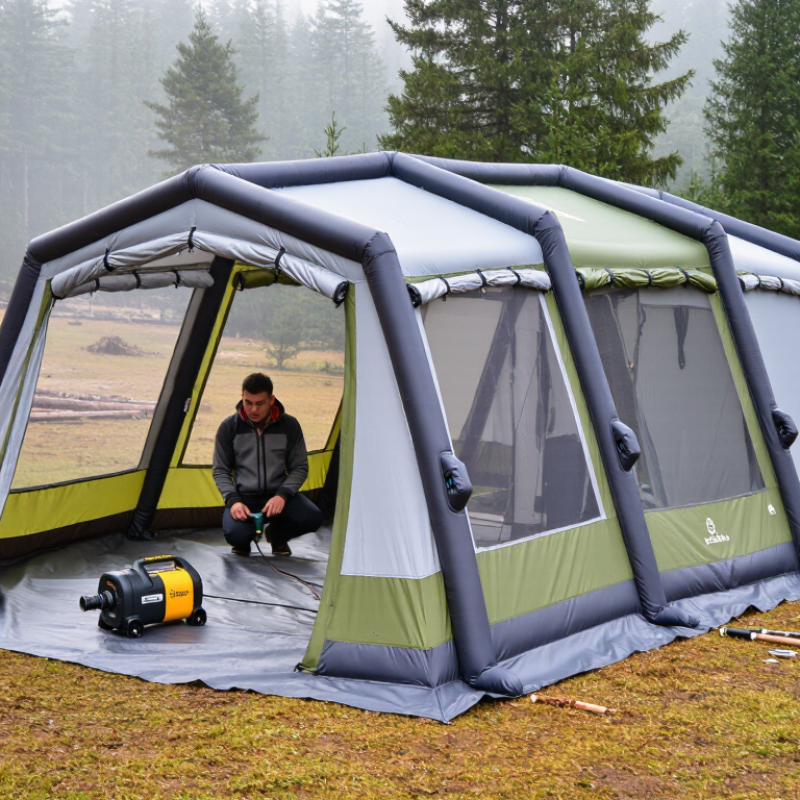
Think about setup time and your physical ability. Check the inflation method, valve design, packed weight, and repair options. A large shelter may need a reliable pump and two people during strong winds. Measure your vehicle space before buying. I once underestimated packed volume and left less room for essential gear. That mistake changed how I compare tent dimensions.
Inspect the fabric, seams, floor, guy points, and transparent panels carefully. Look for clear construction details and test reports from dependable sources. Ask whether the structure remains stable after pressure changes overnight. Check the recommended wind range, waterproof rating, and replacement-part availability. Airtight construction is not the same as complete weather protection. Condensation still needs management. Keep vents accessible, even during rain. Also consider emergency exit access, especially when children or older campers share the space. A small sample of floor material can reveal texture, thickness, and likely cleaning difficulty better than polished photographs.
Buying an airtight inflatable tent starts with fabric, not appearance. Look for coated polyester or nylon with documented tensile and tear results. ISO 1421 measures fabric tensile strength, while ISO 4674 evaluates tear resistance. Ask for test reports, not vague claims such as “heavy duty.” A dense weave should feel firm, without brittle coating or loose threads. Check the seams closely. Weak stitching can defeat strong fabric.
Tip 1: Test air retention before camping. Inflate each beam fully, mark its pressure, and leave it overnight. A small pressure change may come from temperature, not leakage. The Gas Technology Institute notes that air volume changes with temperature, so repeat testing indoors and outdoors. Listen near valves and feel seams with soapy water. Bubbles reveal trouble. This simple check is often skipped.
Tip 2: Match fabric strength to real use. Frequent pitching, gravel, and wind require stronger reinforcement around corners and anchor points. ISO 2411 can assess coating adhesion, which matters when folding and packing. Tip 3: Inspect the repair kit and valve seals before purchase. A 2024 outdoor equipment safety review from the European Outdoor Conservation Association emphasizes routine inspection of load-bearing points, although it does not provide one universal pressure target. That gap matters. Manufacturers still use different fabrics, beam sizes, and testing conditions. Record your own pressure readings, because memory is unreliable.
Use the chart as a practical screening guide. For a 300 mbar inflatable air beam, a 10% pressure loss over 24 hours leaves 270 mbar; higher initial pressures are calculated using the same retention target. Always compare test methods, seam construction, coating type, and temperature conditions before buying.
Check seven points: fabric tensile strength, tear resistance, hydrostatic head, seam strength, initial operating pressure, 24-hour air retention, and valve reliability. A strong fabric and well-sealed seams are essential because air retention depends on the complete structure, not the fabric alone.
When buying an airtight inflatable tent, inspect the seams before admiring its floor space. The 2024 Outdoor Participation Trends Report recorded 175.8 million U.S. outdoor participants, increasing demand for dependable temporary shelter. More users also mean more field mistakes. Look closely at every welded or stitched seam. It should appear even, continuous, and free from puckering. Press gently around corners, where fabric tension is highest. A small wrinkle can become a leak after repeated inflation.
Check each valve with the pump attached. The connection should lock firmly without twisting the surrounding fabric. Inflate the tent fully, then leave it for several hours. Measure pressure loss with the same gauge, because a hand-feel test is unreliable. ISO 5912:2020 emphasizes tent safety, performance, and fitness for use, but real conditions remain less predictable. I once trusted a quiet valve and ignored a faint hiss. That was careless. Use soapy water around the valve; escaping air creates visible bubbles.
Zipper seals deserve equal attention. Close them slowly and inspect whether the teeth align without catching. The covered flap should lie flat against the zipper track. Test it with damp hands. Slippery fabric exposes weak grip and poor alignment. Do not assume a heavier zipper is automatically better. Manufacturer claims can sound precise, yet independent testing is still preferable. Ask for pressure-retention results, seam-strength figures, and repair guidance. Small evidence matters.
| No. | Evaluation Area | What to Inspect | Practical Benchmark or Test | Warning Signs |
|---|---|---|---|---|
| 1 | Main Seam Construction | Check whether structural seams are heat-welded, radio-frequency welded, or carefully sewn and sealed. Inspect corners, floor-to-wall joints, and high-tension areas. | Seam lines should be continuous, even, and free from exposed stitching, pinholes, wrinkles, or unbonded sections. Welded seams are generally preferable for airtight air chambers. | Uneven weld width, peeling layers, loose threads, visible needle holes, or sharp creases crossing an air chamber. |
| 2 | Seam Tape and Reinforcement | Examine seam tape around valves, attachment points, corners, guy-line tabs, and floor edges. Look for full adhesion and smooth transitions. | Tape should be firmly bonded across the entire seam with no lifting edges. Reinforcement patches should extend beyond the stress point on all sides and have rounded corners where possible. | Bubbles, edge lifting, brittle tape, trapped dirt, narrow patches, or tape that separates when lightly flexed. |
| 3 | Valve Body and Placement | Inspect the valve housing, its connection to the air chamber, protective cap, and accessibility when the tent is fully erected. | The valve should sit flat, remain accessible, and be supported by a bonded reinforcement patch. The cap or cover should close securely without cross-threading. | Valve movement under light hand pressure, distorted housing, incomplete bonding, difficult access, or a cap that does not stay closed. |
| 4 | Valve Seal Performance | Check the one-way function, gasket condition, internal flap, and connection between the pump hose and valve. | Inflate to the manufacturer’s specified operating pressure, close the valve, and apply soapy water around the valve. No continuous stream of bubbles should appear. | Continuous bubbling, air escaping when the pump hose is removed, damaged gaskets, a sticking flap, or a loose hose connection. |
| 5 | Zipper Type and Protection | Review door and window zippers, zipper guards, slider quality, and whether the zipper is protected from direct rain exposure. | A tightly woven, coated, or water-resistant zipper with a storm flap is preferable. The slider should travel smoothly without forcing or snagging. | Exposed zipper teeth, gaps behind the slider, fabric caught in the track, missing storm flaps, or a slider that separates the teeth. |
| 6 | Zipper Seal and Alignment | Close each zipper fully from both directions and inspect the bottom stop, corners, curved sections, and contact between the zipper flap and fabric. | When closed, the zipper should show no daylight through the track, no fabric folds inside the seal, and no visible opening after gentle fabric tension is applied. | Misaligned teeth, persistent openings, a loose bottom stop, water collecting beside the zipper, or fabric that pulls away from the zipper tape. |
| 7 | Pressure-Retention Test | Test the complete tent after installation, including seams, valves, air beams, doors, and any removable panels. | Record the pressure using the supplied gauge, leave the tent for several hours in stable conditions, and compare the reading. Investigate any noticeable loss rather than relying only on appearance. | A softening air beam, a pressure drop that cannot be explained by temperature change, hissing sounds, or bubbles during a soapy-water inspection. |
Note: Operating pressure and acceptable pressure loss vary by tent design. Always follow the manufacturer’s inflation instructions and never exceed the stated pressure limit.
Choosing the right size is more important than chasing the largest floor area. Measure your sleeping mats, bags, and everyday equipment before buying an inflatable tent. A listed four-person capacity may feel crowded with four adults and wet jackets.
Allow extra room for movement and ventilation. You should be able to sit upright without pressing against the fabric. Leave space beside sleeping areas for boots, lanterns, and small bags. I once chose a compact tent for easier transport, but the narrow entrance made storing wet gear frustrating.
The interior layout also affects comfort and weather protection. Look for separate sleeping and living zones when privacy matters. A central living area works well for changing clothes and preparing simple meals. However, check whether the divider reduces airflow or blocks the main doorway. Clear pathways are useful when several people enter during rain.
Pay attention to floor shape, head height, and storage pockets. These details are easy to overlook in product photographs. A well-sealed structure should have secure seams, protected zippers, and properly tensioned doors. Ask for measurable interior dimensions, not vague capacity claims. If possible, inspect an inflated display model with your own sleeping mat. It may reveal an awkward corner or low beam that specifications cannot show.
Setup speed matters, but inflation time is only part of the story. The 2024 North American Camping Report recorded 57.8 million camping households, increasing pressure for simpler, faster equipment. Compare the complete process: unpacking, connecting the pump, inflating each air beam, pegging corners, and tensioning guylines. A tent advertised as “five-minute setup” may still need another ten minutes before rain protection is reliable.
Electric pumps usually provide consistent pressure and reduce physical effort. Choose a system with an automatic shut-off, pressure gauge, and relief valve. Rechargeable pumps are convenient at remote sites, but battery performance can drop in cold weather. Manual pumps are slower, quieter, and useful as emergency backups. They also expose a weakness: uneven pressure can make the shelter lean. I once judged a tent by inflation speed alone. That was a mistake.
Check whether the pump connects directly or requires several adapters. Fewer connections mean fewer leaks and less frustration beside a muddy campsite. Ask whether the published time includes pegging and internal dividers. Independent field testing is more trustworthy than a showroom demonstration. The 2023 Outdoor Participation Trends Report counted 175.8 million outdoor participants, showing how widely varied camping conditions can be. Test the tent on grass, gravel, and a windy evening. Real setup time is rarely perfect. That's useful to know.
Tip 1:
Check the tent’s weather rating, not just its advertised waterproof label. Look for hydrostatic-head results, sealed seams, covered zippers, and a raised bathtub floor. A strong fabric can still leak through poor stitching.
The World Meteorological Organization’s State of the Global Climate 2023 report identified 2023 as the warmest year recorded. Weather planning needs more care now. Inspect the inflatable beams for pressure loss after several hours. The valves should lock firmly and remain accessible during rain. I would also test the pump and repair kit before departure. Small failures become uncomfortable quickly.
Tip 2:
Examine wind protection closely. Count the guy points, check their stitching, and confirm that pegs match the ground conditions. A manufacturer’s wind rating is useful, but setup quality changes real performance. NOAA advises sheltering indoors when thunderstorms threaten; an inflatable tent is not a lightning-safe structure.
Tip 3:
Review fire and ventilation information. Look for recognized flame-resistance testing, clear cooking restrictions, and high and low vents. Never block ventilation to retain heat. Carbon monoxide is invisible, and careless heating can be fatal. The U.S. Consumer Product Safety Commission repeatedly warns about portable fuel-burning equipment used in enclosed spaces. Do not assume a large doorway makes a tent safe. I still think many buyers focus on comfort first, which is understandable, but safety details deserve the harder look.
7 Tips for Buying an Airtight Inflatable Tent
Review Portability, Maintenance, and Overall Value
Portability begins with the packed size, not the advertised floor area. Measure the storage bag before buying. Check its weight with the pump, pegs, and repair kit included. A compact tent can still feel awkward if the bag lacks strong handles. I once underestimated this detail and regretted carrying it across a wet campsite.
Inspect the inflation system carefully. Valves should close firmly, and seams should look evenly sealed. Ask whether replacement tubes, valves, and patches are readily available. Test the pump connection if possible. A useful tip is choosing a model that one adult can inflate without excessive effort. Another is checking its stability after inflation. Soft corners may indicate poor pressure or uneven ground. Do not assume “airtight” means maintenance-free.
Maintenance affects long-term value more than a low purchase price. Clean mud with mild soap, then dry the fabric completely before storage. Never pack it while damp. That mistake can create unpleasant odors and hidden mildew. Check pressure before each trip, especially after temperature changes. Compare the fabric’s repairability, warranty terms, expected service life, and replacement-part costs. A cheaper tent may become expensive after one damaged valve. However, premium features are not always useful. Consider your camping frequency, transport space, and weather needs. The best value is dependable performance without unnecessary weight or complicated care.
Count sleepers, sleeping bags, storage boxes, and cooking equipment. Add room for movement and wet clothing. A four-person tent may feel cramped. Measure your sleeping mats before buying.
Think about damp forests, open fields, and windy coastal areas. An airtight structure improves protection, but humidity can build inside. Keep ventilation openings accessible during rain.
Include unpacking, inflation, pegging corners, and tightening guylines. A five-minute inflation claim may exclude these tasks. Real time varies. Test the shelter before a difficult trip.
Electric pumps reduce effort and provide steadier pressure. Choose automatic shut-off, a pressure gauge, and a relief valve. Cold weather can reduce rechargeable battery performance.
Yes, it provides a quiet backup during power problems. It may inflate unevenly if used carelessly. Check every air beam before tightening the shelter.
Look for upright headroom, clear pathways, storage pockets, and useful sleeping zones. Leave space beside beds for boots and lanterns. A divider may reduce airflow.
Inspect seams, floor thickness, zippers, transparent panels, and guy points. Ask for measurable dimensions and pressure information. A material sample can reveal cleaning difficulty better than photographs.
Keep vents open when possible and avoid blocking emergency exits. Separate wet clothing from sleeping areas. Children and older campers need clear paths. I once underestimated this detail. That matters.
Choosing the right Airtight Inflatable Tent starts with understanding your intended use, sleeping capacity, climate, and available space. Pay close attention to fabric strength and air retention, since durable materials and reliable pressure performance improve comfort and stability. Carefully inspect seams, valves, and zipper seals for secure construction and resistance to leaks. The tent’s size and interior layout should also match your needs, providing enough room for occupants and equipment without becoming difficult to transport.
A practical inflation system can make setup faster and less tiring, so compare pump types, inflation time, and ease of use. Weather protection is equally important: look for effective waterproofing, wind resistance, ventilation, and safety features such as stable anchoring and clear emergency access. Finally, consider packed size, weight, cleaning requirements, repair options, and long-term durability. Evaluating all these factors together will help you select an Airtight Inflatable Tent that offers dependable shelter, convenient operation, and good overall value.